Simona Peneva
One of childrens' and adults’ most favourite holidays, Christmas, is approaching. The city streets are flooded with Christmas lights, shops are full, everyone is thinking about the gift that will delight his or her beloved ones. The holiday spirit has captured all. We can create such a warm, festive atmosphere at home too, and with materials at hand. Grab the scissors and let us start.
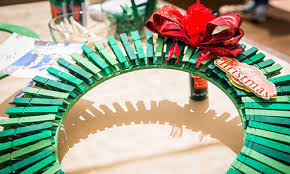 Can you imagine Christmas without a Christmas wreath? It is a key element of the festive decorations and the first thing your guests notice. If you want to do it yourself, you will need the following materials:
- wooden/cardboard/styrofoam wreath shape with a diameter of your choice
- wooden clothes pegs - their number should be sufficient to cover the shape of the wreath
- green acrylic paint
- paintbrush
- silicone gun
- small ribbons and accessories of your choice (strips, pads).
Start painting the pegs. It is better to paint them in various shades of green to make a fresh wreath. If you prefer a wreath of a wider diameter, you can simply spray the pegs instead of painting them, which will save time. Then, paint the wooden/cardboard wreath shape with light green acrylic paint. Having finished painting, start gluing the pegs on the painted side of the form with the silicone gun, making sure to attach them to each other and at the top in order to be able to clip Christmas cards or photos at the bottom of the part that has not been glued. Continue until the wreath is full of pegs. The next step is to stick one of the ribbons at the bottom of the form. Optionally, you can stick pads or other ribbons to the other sides. Then, take one of the strips and thread it once at the top of the already finished wreath, stick both ends and it is ready to hang on the wall with a nail or tack.
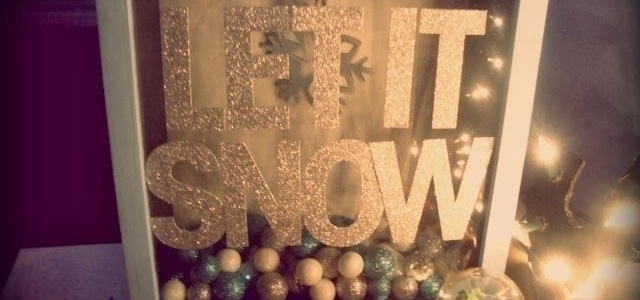
An even simpler idea of our "DIY" Christmas project is a three-dimensional picture. It is ideal for  those who spend much of their time at their desk and you can put it on the night table too. You will need the following materials to make it:
- a photo frame, with space between the glass and picture
- cardboard with Christmas ornaments
- stickers with letters
- scissors
- glue
- acrylic paint of your choice
- small coloured bells/chimes or other small accessories.
Start painting the frame in the preferred colour, unless you have bought a ready coloured frame. The colour red would be best because it symbolizes Christmas and attracts attention with its brightness. Then, take the rear of the frame, put it on the back of the cardboard paper, outline its shape with a pencil and clip the shape. The next step is to put glue on the inside of the back of the frame and attach the clipped cardboard paper with the Christmas ornaments. Continue by putting the stickers with letters on the glass frame. The inscription is at your discretion but it would be better if it were short in order for the background to be visible. The last thing you should do is put the bells/chimes (or other accessories) in the space between the glass and the back of the frame. You can also spray the inside of the glass with artificial snow for a more realistic effect.
 The next idea is for our more romantic readers because it is called a "fairy-tale in a jar." It is most suitable for the cabinet or night table for you to enjoy it before falling asleep. If you would like something like this in your home, you will need the following:
- glass jar
- artificial snow
- Christmas figurines, houses, trees
- ribbons or strips.
Start spraying the inside of the jar with artificial snow. Then, choose one of the figures and stick it to the inside of the lid. Spray with snow again, turn the jar with the lid down and that is all. You could use coloured jars as well. In addition, if the opening of the jar is large enough for you to insert your hand into the jar, you can stick the figures to the bottom and you will have a bigger fairy-tale in it. Optionally you can put the ribbons around the neck of the jar, the bottom or in the middle.
The simplest idea is the paper snowflakes that are familiar to all. However, because of our fresh design, we will not leave them so simple. Having cut the paper snowflake, use a brilliant or silver spray. Make a thread loop in the upper part and then hang it on the cornice, lamp or wherever you decide.
For those who have forgotten how to make paper snowflakes, here's a photo to remind them.

These decorations will not only entertain you while you are making them but will also fill you with the Christmas holiday spirit. You can make various snowflakes and give some to a friend.
Enjoy the decoration.
Source of ideas: Bethany Mota


